Crazy about crochet

I think I have found my latest craft love: CROCHET!!

I tried learning crochet a couple of years ago now and found it terribly difficult and my hands would cramp up something shocking so I threw it in the corner (yes, my frustration got the better of me) and vowed one day I will conquor it. Fast forward a couple of years and I just wanted to have a go at making a granny square blanket. I retrained my fingers to choose another more comfortable position and just crocheted and crocheted. I ended up completing my over the knee throw blanket (sorry I neglected to take photos).

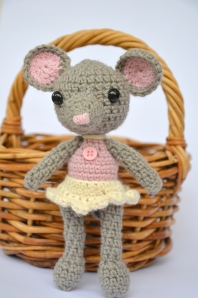
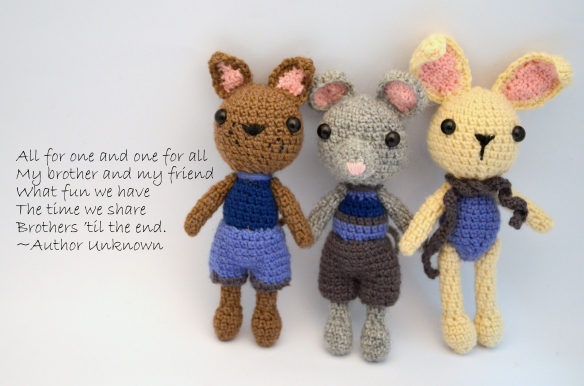
Half way through another blanket for my daughter I got side tracked and started to make cute wittle animals.

DSC_0099

I loved the idea of making a set of brothers and sisters, so incredibly cute.


DSC_0010-002

The love of crochet still consumes me as I am really enjoying being around my family. I may be crocheting whilst they are all watching telly but we are together. With sewing I am shushed away to the corner so they dont hear the whirring of the machine, plus I cant really listen to any television when sewing either.

I have custom listings of either a set of three or just individuals on my etsy store. In these listings you can choose which colour you would like their bodies made from, colour of their clothing, flower no flower, shorts or no short, and more and more options. I really can make to your request, well to some extent. If you are interested please head on over to my etsy store for a look see.

As for which one is my favourite, hmmmmmm. It would have to be the bunny boy or maybe even the mousey girl.

DSC_0052

DSC_0022-001

Make your own bag tag tutorial.

This is a fun little project for your kids to do along with your help. There are a few materials required but once you have them you make make more bag tags for years to come. It is also a quick project, well that depends on how meticulous they are in their drawings. My daughter took forever.

20140126-130730.jpg

Materials required:
– plain cotton and pattern for the reverse.
– felt
– fabric markers
– pinking shears
– eyelets and tool for insertion
– circle clip to hang to bag ( the name eludes me at the moment)

Okay let’s get started.
1. Cut out your plain fabric shape. You chose how big or what shape you want ( or should I say your child).
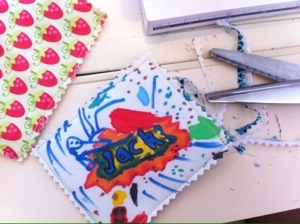
2. Give them the fabric markers and let them design their little hearts out. I taped the fabric to the table to stop it from slipping.

20140126-131436.jpg
3. When finished iron fix the design. Follow instructions from your fabric makers.

20140126-131702.jpg
4. Cut out the patterned fabric and felt to the same size as your design piece. The felt will go in the middle to give it structure.
5. Using the sewing machine, sew the three layers together. A quarter inch from the edge. Use the pinking shears to clip the edge. This will prevent fraying.

20140126-132008.jpg
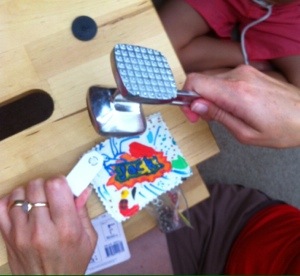
6. Using the instructions from your eyelet packet insert the eyelet into one corner. I broke my tool ages ago so I have to hammer upside down but it’s really simple to do.

20140126-132151.jpg

6. Last job to do is to put on the circle clip and attach to bag. The name will come to me eventually but for now all I can tell you is that I got it from a stationary shop for 20c.

20140126-132404.jpg
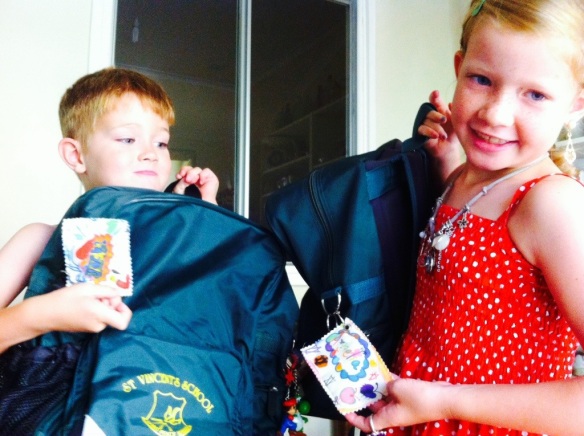
Voila, two happy campers.
Unique and personal name tags that helps them (my two) find their bags in a sea if green.
Happy crafting!!

20140126-133130.jpg

More great Christmas Decoration Tutorials.

There are so many great tutorials out there to make your own decorations. They can be inexpensive and great to make with your loved ones.  Here are a few more to inspire you this christmas.

1. Glass ornament tutorial 

2. Christmas felt ornaments

Christmas felt ornaments

3. Christmas Advent calendar

 4. Paper christmas tree.

5. Christmas Bling

6. Fabric christmas tree

7. Fabric ornament ball

IMG_4900

8. Candy wreath

9. Bird Tutorial

10. Christmas stockings

Are you thinking of Christmas Decorations yet??

With only seven weeks to go my mind is beginning to think about decorations, especially if the venue is to be my place. As usual I want to save money and make my own but I think I end up spending more in supplies than if I was to buy pre-made. BUTTTTT Handmade is so much nicer and so unique that I embrace it.

So where to start, hmmmm. Table decorations.

I am looking along the lines of buying some tall (or even different heights) glassware from the thrift store and putting sticks in them. Then hanging a few ornaments on them. Similar to the picture below but changing the eggs to perhaps baubles. I always find that you cant put too much on the table as then you have no wear to put the food, so I thought something bulky uptop will give more table space.

Add a few candles, some crackers (sorry I havent yet attempted to make yet) and a colourful runner and voila perfect.

I also like the idea of hanging tissue paper pompoms above the table, wonder if I could incorporate the two. Perhaps I could just fill the glassware with christmas coloured lollies, gee the kids would love that, me too infact.

Pom Pom Tissue Tutorial

I was also looking at making some bunting but not sure in between sewing christmas presents and Mellebug wares that I would have the time. I loved this idea, very different to the norm.

11 Modern word banners and tutorials

For me I think I will be attatching tree decorations to string, simple but effective. You could also spell out “christmas” using these cool decorations made by Jac&Skeet. They would look sweet hanging above the fireplace (pity we dont have one).

Jac&Skeet on Facebook.I have been looking into making my own wreath and I came across thisI went and bought the wire loop at spotlight for $2 (cheap!!) and have made a start. Will most definently show you the finished product.Whats next?A little bit of recyclingPaper ornament tutorial

.I have been looking into making my own wreath and I came across this.

DSC_0702 2

Fabric wreath tutorial

I went and bought the wire loop at spotlight for $2 (cheap!!) and have made a start. Will most definently show you the finished product.

Whats next?A little bit of recycling Paper ornament tutorial

Paperback Christmas Tree, DIY Christmas Decor, How To Make A Paperback Tree

Paperback christmas tree tutorial

Scrap christmas ornament tutorial

This is super cute, feltey christmas tree tutorial by Julia Crossland

Felt tree tutorial

There are stacks and stacks and stacks and stacks of great tutorials for making your own tutorials. I could sit here for hours browsing them all but really not an option with two buzzing bees circling me wanting to play.

If you are not a maker dont dispare, there are heaps of gorgeous handmade decorations all ready to be delivered to your door. They are all made with love,  most often  in someones lounge room (like me).
Check out places like Madeit, Etsy and even on facebook.

Beautiful butterflies

At the moment there are hundreds of baby butterflies fluttering around our garden. The other day we walked along the bush track across from our house and as you walked plumes of butterflies would fly off. Amazing! We have never seen anything like it.

Lucky for the butterflies out backyard is amass of flowers at the moment so we get many visitors. Out came the butterfly net this morning and the kids caught some to admire for a small time and then happily release.

Beautiful fascinating creatures that are inspiring to the creative world. I have found some gorgeous tutorials that you could have a go at home (click on the photos).

TBP_13

Tutorial


Origami Butterfly


The hair clip looks really cute. It will go on my list to make ‘one day’.


Sweet little birds

I am absolutely in love with these little birds.

It is still true that my sewing machine is in temporary retirement, these little cuties are all hand sewn. Of course these would be made so quickly with a machine but in one sitting you could hand sew one up, a little cathartic actually. I have and still am enjoying making these birds, I have cut out quite a few and I am slowly sewing them up as a sit like a beach whale unable to do an awful lot (I even plan to take them to hospital, a little crazy I know).  I am making a string of black, white and red ones for the baby and plan on making a few more mobiles for up and coming birthdays.

(link to the pattern in my last post)

Counting down the days now, a little terrified but excited at the same time.

Keep you posted.

Amelia’s new pretty box

Amelia is right into what she affectionately calls ‘pretties’, so necklaces, bracelets and everthing ‘bling’ is referred to as a pretty.

In an attempt to keep these pretties contained I decided to get a paper mache box and get her to paint it. It was a very short and sweet activity but she enjoyed it.

Here is the finished product.


Cheeky monkeys

Arent these adorable? 

My little niece is turning 4 soon and I wanted to make her a little softie from a book that I was given for christmas, appropriately called softies. 

There is some great patterns in there and for 25 dollars it is a bit of a bargain.

So I started making the first one (the darker pink/purple one) and before I had finished stuffing the body Amelia snaveled it and was not going to let it go. There was no way I was going to be able to give it to my niece Edie without Amelia causing a fuss so I had to make another. From start to finish it only took a couple of hours to complete, its super easy and I was able to make a small version of it because I was too lazy to go to the library and enlarge the pattern.

Amelia did find the second monkey (I really should have hidden it) and again she was off, giving them kisses and playing how do you do with them (remember the song: two little men meet in the lane, bowed most politely……..).

I am really happy to see how they turned out. I am also happy with the fabric combination of the first monkey because I am using those and a lilac pinwheel cord to make Amelia a patched jacket for winter. I am near on finishing Amelia’s winter sleeping bag so you should be seeing that very soon, so as soon as that is done I will start on this jacket which apparently has 26 pieces of pattern to it (omg!).

Happy Easter!

I felt a little uneasy as easter came around this year due to the fear of Amelia eating chocolate. She has yet to be given any and I would strongely prefer it that way but I just knew that family members will buy her some (regardless if I said not too) and her little cousins will have easter egg hunts in the garden. I dont want to be the party pooper and say that she cant be involved. She is too smart not to know that there is something tasty inside that golden wrapper, all it takes is her to watch one person do it and she would copy.

 So in an attempt to curb the eating of chocolate I spent the night before decorating blown egg shells, I think these are much better than the chocolate ones.

We put them around the garden in the morning and gave her the basket to carry. The first one she found she thought that it was a ball, thus it went flying and then smashing into the ground. OOhhh goes Amelia as she went to pick up the pieces and put them in her basket. Never mind, lets go on and find some more. So off she goes, ohhing and aghing as she sees one, she thought it to be very exciting. Unfortunately I did not make enough and so soon she was saying more, more, so I proceeded to pinch them back out of the basket and put them out again.

We were suprised at her response to the egg hunt, we did not think that she would understand what to do. How wrong were we. I will certainly be doing that again and perhaps next time I can find some plastic eggs that open and put little treasures inside of them.

In regards to the chocolate issue, we were spared. Her nanny bought her some jelly beans, that I can live with and her little cousins had their easter hunt at their houses thus no choccy eggs. Her uncle bought her a stuffed bunny which she clung to all day and she got lots of kisses and cuddles, just enough to celebrate easter.

Amelia loves to paint

I finally succumbed to buying some commercial childrens finger paint. Thought I would try and make it myself, and perhaps in the future I will, but for now I did not have all the ingrediants in the house and it seemed much easier to go buy the paint.

However the point is that regardless whether it is bought or hand made the painting experience is the same and Amelia loves it. The first time I brought it out I taped a large piece of paper (from a roll) to the kitchen table and put some paint into little containers (the next time I put it into a ice cube tray and that was much easier for her to manage). She managed to put most of the paint onto the paper, a little on her but thankfully none in her mouth. Surprised I was.

We put her finished painting up into her bedroom and then the next day she was pointing to it indicating that she wanted to do some more, so out it came. This time I did little drawings and then she tried to colour them in. I believe that this little activity will become a regular occurance along with drawing with crayons.


Amelia is also enjoying playing with play dough. I did try and make some but after awhile in the fridge it became sticky so not the best if you are trying to keep the mess to a minimum. I did buy some but will try another recipe to see if that makes a difference. For now she does not do a great deal with it, enough to keep her occupied for a little while, so once she gets more into it I will start to make some.

Another activity that we are enjoying together is playing dollies. I pulled out my dolls clothes that I used to play with and dress her teddies and dolls. I am looking forward to having tea parties with her, thinking I will get her a teapot set for her birthday.

If you are looking for more ideas on craftin or just playing with your young toddlers check out the list I was sent in the comment section to the post ‘craftin with amelia’. Some great ideas there.